I've had a lot of fun with my upright MAME cabinet, but being a big fan of driving games it had a certain something missing. Sure, you can play Out Run with the joystick, but it feels very wrong. I decided it would be great fun to have a proper sit-down "cockpit" style driving cabinet.
My first approach to this was to see if any of the amusement suppliers in the area had any old driving cabinets that they would be prepared to part with for a little cash. I didn't hold out much hope for getting a result here, it was hard enough to find an upright cabinet, and I got exactly what I had expected -- nothing. Short of buying a fully working (and very expensive) modern cabinet, there was nothing available.
So I had to resort to Plan B: build it myself. I make my living as a computer programmer, not a carpenter, and so my woodworking skills are fairly limited. But I'm determined to make this work, so I rounded up my drill, jig saw, screwdriver and tape measure and set to work.
Here's a diary of my progress that I'll update as and when things get done.
10th January, 2006
First things first, I needed to get the base built. All the rest of the unit rests on here so it needs to be the right size and strong enough to keep the rest of my project upright.
The main base is built from chipboard (or particle board, as I believe it's referred to in the USA). The main reason for this is that it's lighter than MDF, and it's cheaper too which doesn't hurt. This part won't actually be visible in the finished cabinet so the slightly rough surface doesn't matter.
I spent a lot of time considering the dimensions I wanted to use for the base. I decided I wanted the sides of the unit to reach right to the floor, so the base will be completely contained within them. I want the unit itself to be 27 inches wide, as this is just thin enough to fit through standard-width doorways (so that one day I can get it in the house). I therefore made the base 26" wide (the remaining inch will be the width of the two side panels).
The length of the base is 6 feet. I had actually considered reducing this to 5'9" -- for the simple reason that chipboard and MDF are sold in sheets that are 4' x 8'. At 5'9", I could get material cut for the side panels at a length of 70", giving me exactly 26" left over for use as one of the cross-panels (front/back/top). In the end I left the base at 6' long, and will make some small rectangular inserts to fill the slight shortfall in the side panels (more on this later).
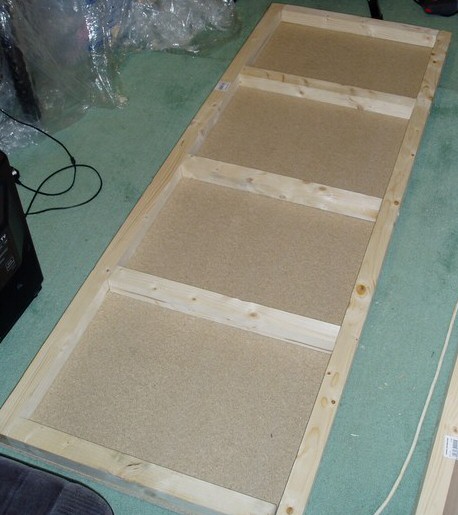
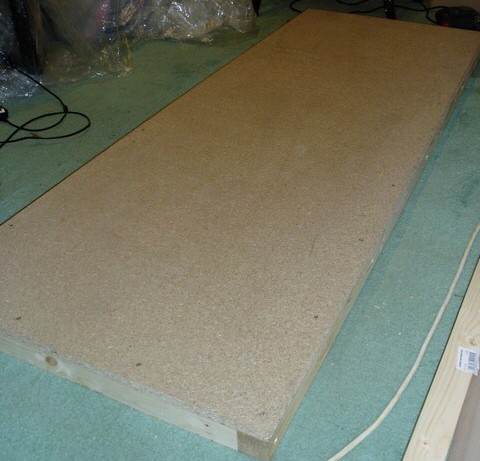
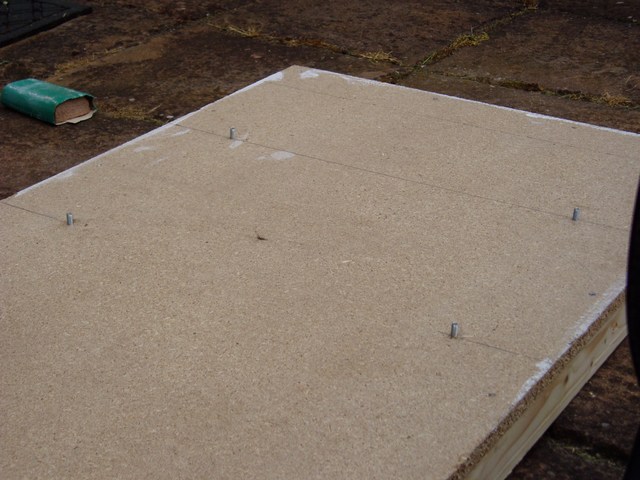
Here then is the base, with wooden reinforcements underneath to stop the whole thing breaking apart when someone stands on it.
The under-side of the base.
(Click for larger image)
The base, right-side-up.
22nd January, 2006
After a bit of a gap, I finally found some more time to work on the cabinet. In the mean time, I have managed to get my hands on most of the components I need. I now have:
- A PC (not a very good one, but it'll do for now)
- A car seat (a driver's seat from a 1988 BMW -- complete with all the seat position adjustment mechanism)
- A steering wheel and pedals (MS Sidewinder Force Feedback wheel)
- A 24" television (with both SCART and S-Video inputs)
- 4.1 surround sound speakers
- Most of the material that I need to build the rest of the cabinet
I decided to use a TV as once this is finished I plan to put a PlayStation2 inside as well as the PC, giving me access to loads more driving games. The picture is a bit crap when using the PC, but it's still fine for playing games so I'm happy to keep it.
The next thing I wanted to do was construct the sides of the cabinet. The obvious material for this was MDF, as it's possible to paint it and get a very nice finish. It's a little heavier than chipboard but it's only the sides that need to be made from MDF, so the overall weight will hopefully be bearable.
I decided to make each side from two separate pieces of MDF. The main reasons for this were that I couldn't get close to fitting a full 6'x 4' sheet of MDF in my car, and also that I was concerned about how manoeverable the full-size sheet would be for me to work on. Halfway along the length of the cabinet, the "doorway" opening is at its thinnest at both the top and bottom of the unit, so this proved a convenient location to break the sides in two. I'm hoping it'll be easy to hide the join once it's all finished... :-)
The design for the sides was inspired by Sparky's Driving Cabinet. I marked up the layout on the side of the MDF, and then cut it out with a jig saw.
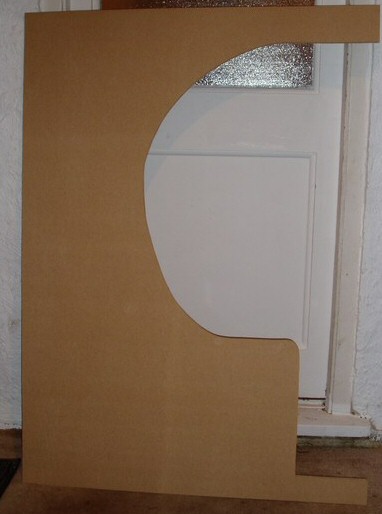
One of the two side pieces for the back of the cabinet.
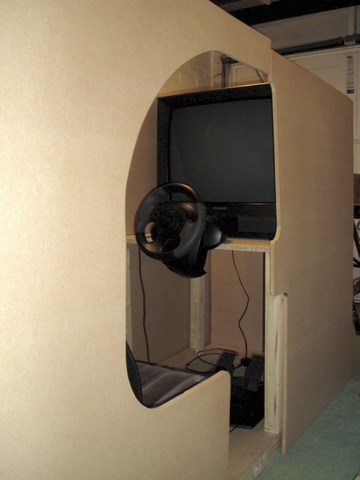
This side could then be used as a template to mark up the other side. With this done, I stood the side and back pieces together around the base to give me an idea of how it's all shaping up. With the seat and pedals in place, it's starting to look how it does in my mind. :-) The television isn't in quite the location it needs to be (it needs to be a bit higher up than this), but it's as close as I can get it at the moment.
The sides, back and part of the top.

The view from the front.
With these bits all ready, I can start to screw them together so that they actually have some strength and don't threaten to fall on whoever is foolish enough to sit in the driver's seat. After that, construction of the front of the unit can begin. But this will all have to wait for another day.
28th January, 2006
I decided to re-shape the back of the cabinet a little. I wasn't finding the shape that I'd cut for the rear side panels as aesthetically pleasing as I had hoped, so I decided to remodel this a little. I also cut a 45° angle at the back, which I think will make the overall shape of the unit much nicer.

The updated shape of the back of the cabinet.
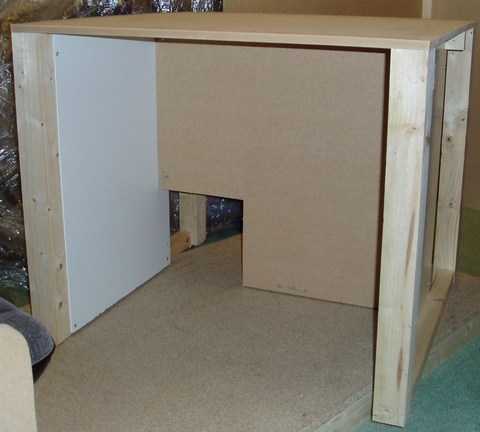
The next major piece of work was the front. The front side panels didn't need a huge amount cut from them to complete the doorway, so I got those panels ready. I do still want to take a diagonal slice from these at the front/top, but that can wait until later.
With the side panels cut, I constructed a stand onto which the TV will be placed and the steering wheel clamped. This is temporary at the moment and looks pretty crude, but it will suffice until I can get the rest of this frame put together.
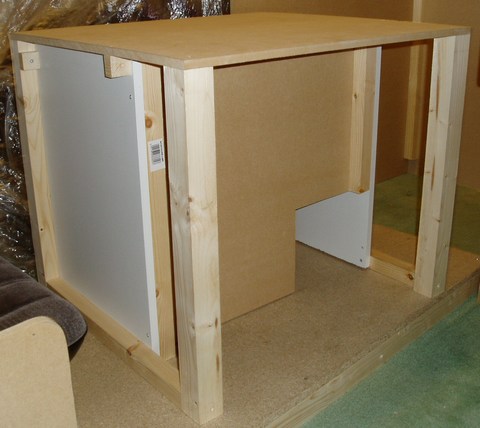
All of the side panels are now assembled and ready to be secured together, then I can start to work on constructing the top of the unit.

All sides of the cabinet together.
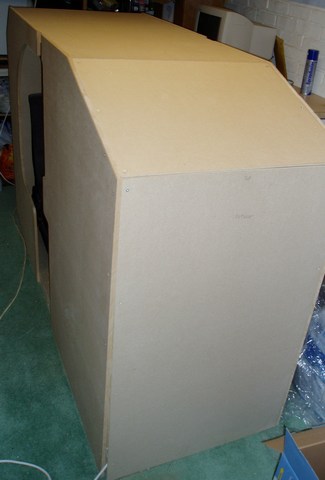
Side view.
15th February, 2006
Finally found time to continue with the build. The next thing I wanted to do was finish the frame on which the TV will stand, and to which the steering wheel is attached. I spent a long time thinking about how I wanted to make this, but eventually settled on a simple design that's effectively like a small wooden table.
Between the wooden legs, running front to back, are wooden supports to keep the legs straight and parallel. Inside these supports I attached two sheets of chipboard that hide all the framework away from the person inside the cabinet. Two vertical pieces of wood were then attached to the side sheets, and a vertical sheet of MDF screwed betwen them. This sheet forms the back panel of the footwell, provides rigidity to the whole framework, and also reinforces the top surface to help carry the weight of the heavy TV which will be placed on top. The rectangular hole that can be seen in this panel is for the subwoofer of my speaker system to sit in.
The finished stand viewed from the front.
The finished stand viewed from the back.
With this completed I could finally make a start on getting the front side panels finished. With a couple more pieces of wood to join everything together, the front panels were joined and placed into position.
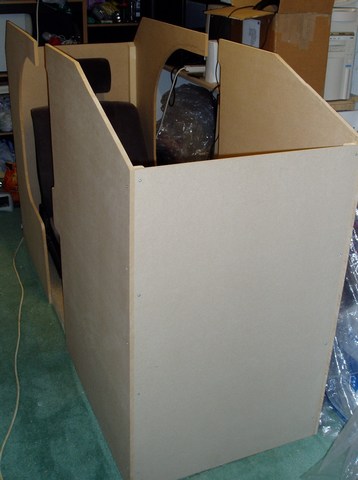
All side panels in position.
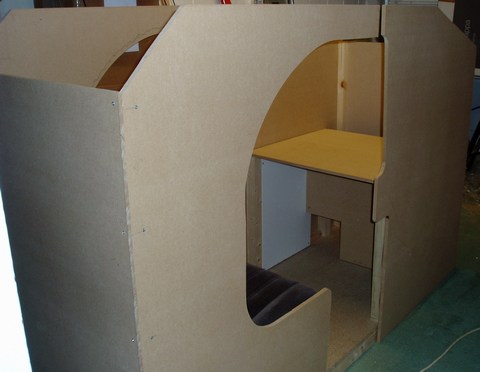
The TV stand is fitted in place inside the cabinet.
16th February, 2006
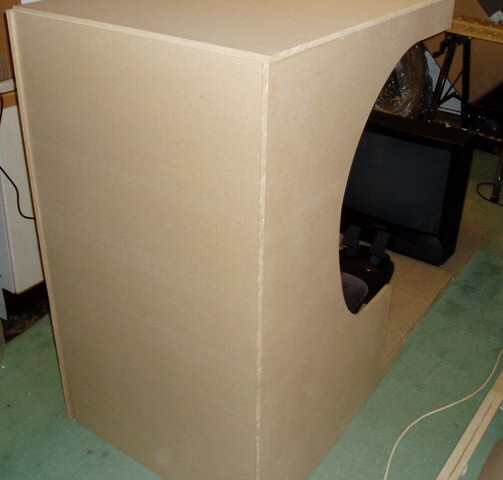
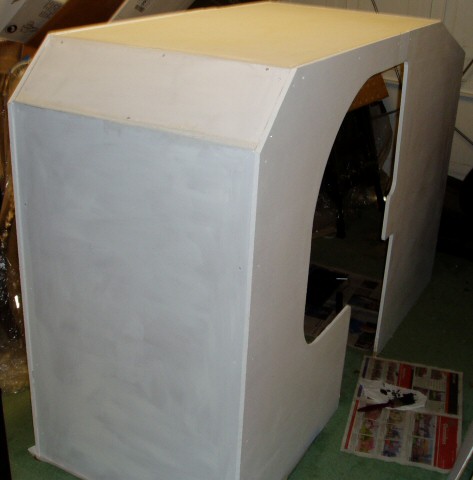
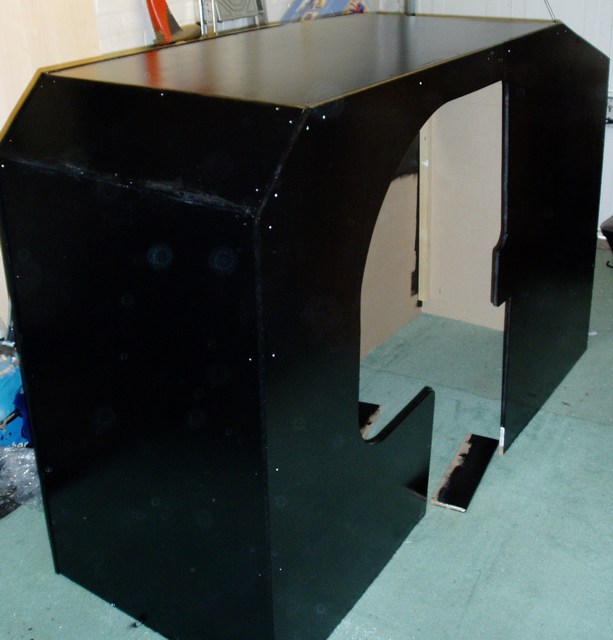
The cabinet was now ready for the remainder of the construction to be completed. The top panel was fitted in place and attached, and so were the two diagonal panels that form the front and back top corners. There are lots of gaps (hey, I'm a computer programmer, not a carpenter!) but these can be filled in later on once the cabinet is painted.
The frame of the cabinet is complete.
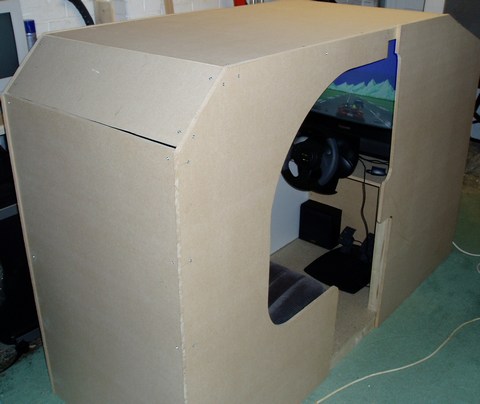
View from the front.
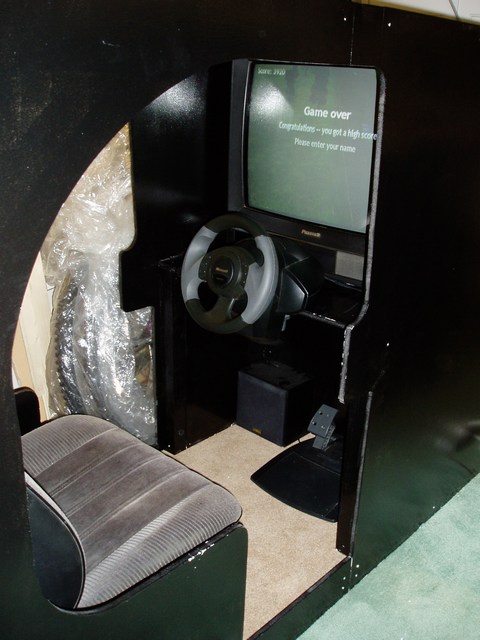
As you can probably see from the picture above, I couldn't resist putting all the rest of the bits in place to see how it all looked. The PC fitted just fine in the back, though as ever it's a huge tangle of wires...
Has anybody got any cable-ties?
Here are a couple of pictures of the cabinet in action.
Magical Sound Shower, here we come...
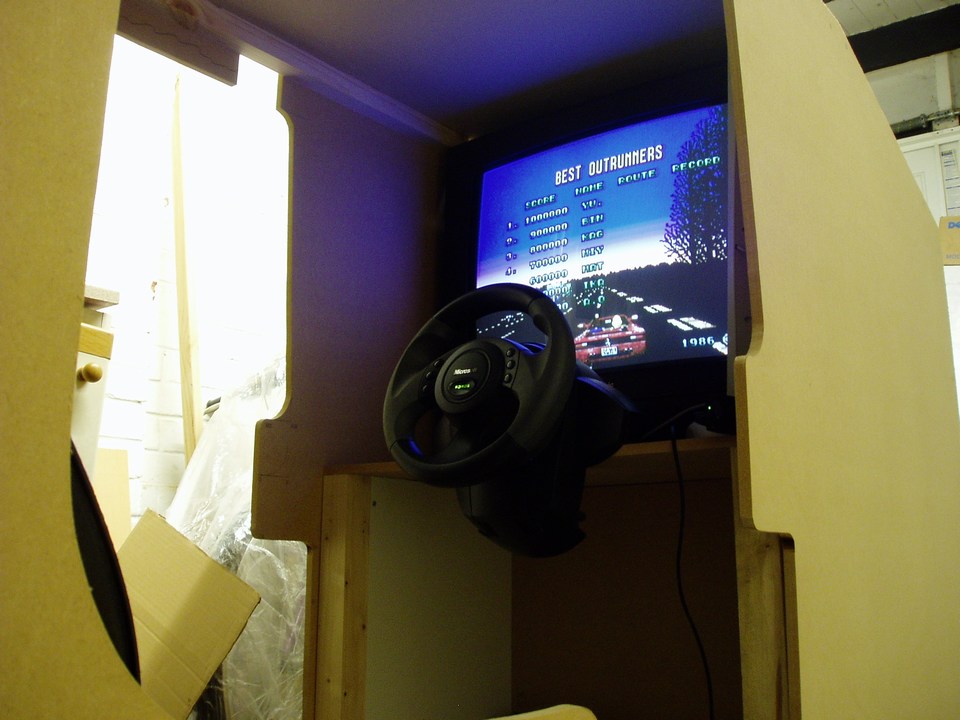
My favourite picture of the cabinet so far. :-)
The construction of the cabinet is now essentially finished. Next step: priming and painting...
27th May, 2006
Well, after a huge delay (blame these guys), I've finally found some time to continue. I have got to get this finished, as it's currently filling the whole of my garage and generally getting in the way.
The priming is all completed now of the main frame, both inside and out, and also the inner table unit. I've also used some filler to fill in all the gaps and crevices in the outer frame, so the whole thing looks much better now. The filler has all been sanded down and hopefully won't be noticeable once it's been painted.
Priming complete.
I've also started painting the cabinet black. I'm using a lovely black gloss paint, which makes everything shine and reflect the light around it. The table unit has been painted (though it needs at least one more coat) and so has the inside of the cabinet. The outside is next on the list, at which point it should start to look a lot more like the finished article...

The internal table painted in black gloss paint.
18th June, 2006
It was a nice sunny weekend so I took the base of the cabinet outside to get the last few bits finished. I decided to put a large sheet of hardboard, smooth side down, on the bottom of the base. This serves two purposes: firstly it'll slide easily over carpet making the cabinet easier to move, and secondly the side panels will rest on top of the board, stopping them from catching on the floor when moving the unit.
Before doing this I needed to fit the bolts for the seat in place. These were measured out and then secured from below so that I could fit the seat later on without requiring access to the insides of the base. With the bolts in place I tested fitting and securing the seat, which fit very nicely.
Bolts for the seat attached to the base.
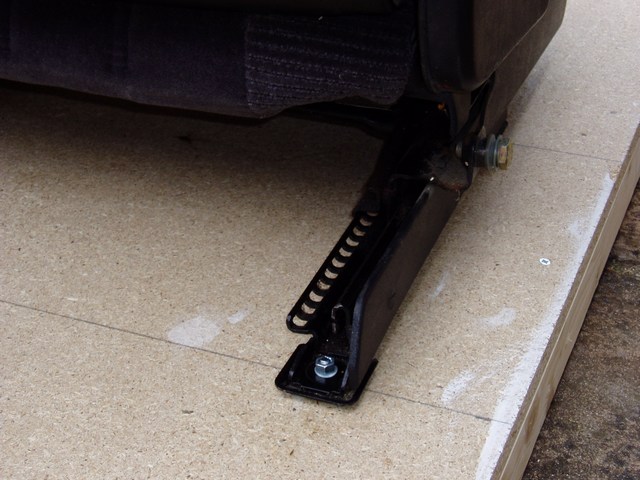
The seat bolted into position.
20th June, 2006
Into the home straight... The outside of the unit has now been given two coats of paint and is looking rather nice. Now it's time to begin putting the completed unit together.
Main unit painted ready for final assembly.
I cut a section of carpet to match the size of the base and punctured it so that the bolts for the seat were accessible. With this done the seat was fitted and secured into place. The base was then slid into position in the unit from the front.

Carpet fitted and seat in its final position.
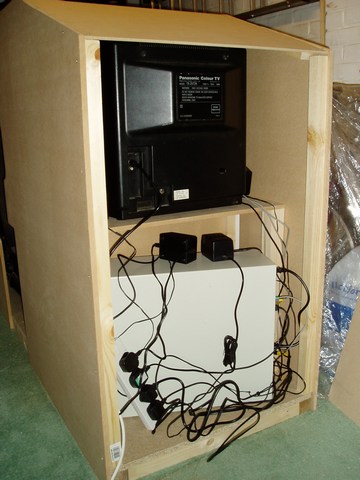
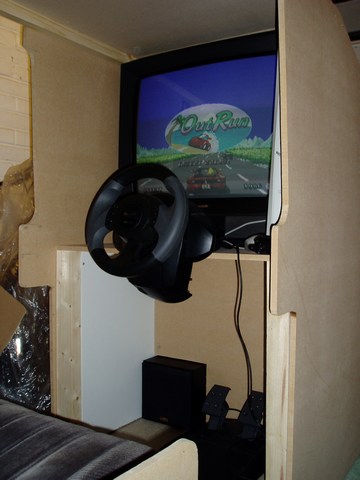
At this point I put the TV table into position and then screwed all of the sides of the unit to the base, and to the table itself. The whole unit was then firmly secured. Then I put the TV into position (good grief, it's very very heavy!), fitted the wheel, pedals, sub-woofer and four surround-sound speakers. Everything was wired up to the PC and ready for the moment of truth -- switching it on!
To my relief, six months of sitting in my cold garage hadn't done any of the components any harm, and everything worked perfectly.
All components now fitted in place and running.
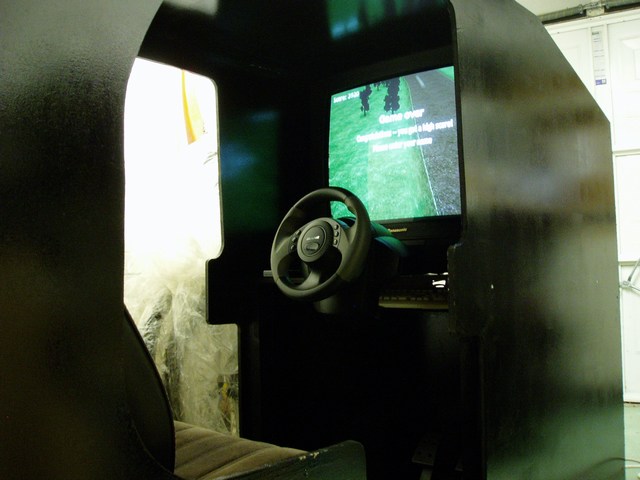
Let's drive!
21st June, 2006
As I had planned all along, I bought a Playstation2 today to add to the unit. I figure this will give me a lot of additional driving games to play, especially as the PC I have fitted isn't up to the task of playing many of the newer driving games (though it's great for Highway Pursuit and emulation).
Unfortunately I found that contrary to various suggestions on the internet, the Microsoft Sidewinder Force Feedback wheel DOES NOT work with the PS2. I can't say I'm overly surprised by this (I would have been more surprised if it HAD worked), but it is a disappointment.
Amazon have a force feedback wheel available that claims to be compatible with both the PC and the PS2, so I've placed an order for one of these. I'll have to wait several weeks for delivery though so I can't get the whole cabinet finished for a bit longer. Never mind, even playing the PS2 games with the joypad is most enjoyable -- but with the wheel it will be really great.
30th June, 2006
My PC/PS2 wheel finally arrived (actually a little quicker than I expected). The pleasure was short-lived however, as three of the buttons didn't work. So it's currently back in its box waiting to be shipped back to Amazon for a replacement. Oh well.
3rd July, 2006
To my surprise, my replacement wheel arrived from Amazon today -- I'm extremely impressed with the way in which they handled the situation, full credit to them. And the new wheel is working perfectly.
That pretty much concludes the initial construction of the unit, it's doing everything I had hoped it would. It was a lot more work than I expected but it's all good fun and has increased my limited DIY skills somewhat. :)
The only major piece of work left is to get some artwork applied to the sides of the cabinet. Not a huge priority, but it won't be really finished until that's done.
15th April, 2007
Wheel failure #2... Unfortunately, half of the buttons on the Thrustmaster wheel have failed again, and this time Amazon are saying that they can't replace it due to the problem being widespread, so instead they're refunding my money. Whilst I think Amazon are doing a fine job with their customer service, the whole episode is extremely frustrating as this is the only wheel I have found that is compatible with both the PC and the Playstation 2 -- unless anyone knows different?
So anyway, it goes without saying that I withdraw my recommendation for this wheel. I'd avoid it like the plague. And I have to question how reliable other Thrustmaster products are likely to be based on the 100% failure rate I've experienced with their wheels. For the time being my driving cabinet is out of service while I work out what to do for a replacement steering wheel...
29th May, 2007
Well it took over a month, but I've finally managed to get hold of a replacement wheel, this time a Logitech Driving Force Ex wheel. I originally ordered from Amazon.co.uk, but after waiting over four weeks for them to get stock I cancelled the order and went to GAME, who despatched next day. I wish I'd noticed that they had it in stock sooner!
This wheel is only advertised as being compatible with the Playstation2 and Playstation3, no mention is made of PC compatibility. I had spotted a post on one of the Logitech message boards stating that it would work with the PC however, so I took a chance with it.
And the good news is, it works perfectly with the PC. I installed the driver software for the Formula Force Ex wheel (which looks identical, apart from being a different colour and not having the PS2 symbols on its buttons) and connected up the wheel, and the driver recognised it straight away. All the features seem to be working, analogue wheel and control pedals, force feedback and all the buttons respond fine in Windows. I really think Logitech are missing a trick by not advertising this as PC compatible -- I probably would have bought one of these in the first place had they done so.
My initial impression is that I actually preferred the Thrustmaster wheel a little, it had several configuration options that are missing from the Logitech wheel and the Logitech's force feedback seems a little weak in comparison. But it's very nice to have a wheel that actually works, and as long as it continues to do so I'll overlook these little details. :-)
If you have any comments or suggestions regarding this article, please don't hesitate to contact me.
This article is copyright © Adam Dawes, 2006-2007.
It may not be copied or redistributed without my express written permission.